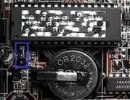
cmos battery and taking desknote apart / reassemle it
the battery is not really accessible without removing the top cover and the metal shielding under the top cover.
When you know how-to, it's not a difficult thing, just a lot of work because of the multitude of screws. Risk is really only not to apply the proper length screws in the proper positions. This can result in the screws causing little protrusions up in the plastic of the top cover.
Remove DVD (necessary) and HDD (optional if you don't want to take the board out of the bottom cover)
1) put the a928 upside down
2) unscrew and remove three screws that fixate the DVD (above type sticker); remember which screw came from which hole; remove DVD by sliding it sidewards out
3) open HDD compartment and take HDD out; stick 2 screws to HDD cover with scotch tape
4) open DDR memory compartment, stick screws to cover, remove metal cover, remove DDR unit, remove bottom shield and stick the screw that holds it with tape to the shield
5) loosen 8 screws around the perimetry, three screws in the edge where the DVD was, and three screws where the DDR memory shield was. Don't take the screws out of the holes but put pieces of Scotchtape on the openings so the screws cannot fall out.
6) put the a928 in normal position and take the keyboard out: gently pull right bottom tip of keyboard up and one by one press towards the front the little click-fits that you find down from the down-arrow, microsoft key, alt key, and ctrl key; gently pull a little towards the front the brown flatcable fastener and pull the flat cable out; remove keyboard and the shield underneath.
7) remove the hinge covers by pulling back and front outward so they unclick and lift them up. Remove plastic LED cover
8) unscrew power-key panel and stick its screws to it; unplug it and mark orientation of the plug vs. receptacle.
9) pull cables of the LCD after having marked their orientation.
10) unscrew 4 LCD hinge screws and put the LCD in safe place with its screws
11) unscrew and remove the 9 or 10 screws that hold the top cover; one may be under warranty sticker; tape them to the top cover oriented with were they came from.
12) remove the touchpad flatcable from its socket like you did the keyboard one
13) now lift the cover a bit and pull out the microphone plug; note orientation; remove top cover
14) remove 4 screws along front of metal cover, one in top right corner and one in top edge metal frame and stick them to the shield cover such that you know what came from where; pull up the metal frame
Now, after unscrewing 43 screws ...., you'll see the CMOS battery. I.m.h.o. it was a design mistake to put it there, so difficult to access.
Good luck


