Watches (Experimental Photography)

Quadophile

Hon. Acoustical Engineer
Moderator
Joined
Mar 16, 2002
Messages
6,651
Reaction score
571
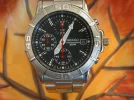
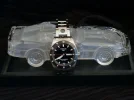
I was feeling lazy this Sunday afternoon and decided to stay at home and do some still life photography which would also come in handy for my children's learning experience.

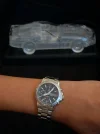
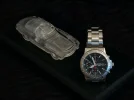
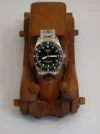
Working with highly polished surfaces like glass and crystal and stainless steel requires creative lightning techniques and patience. How far I have succeeded is for the viewer to judge.

The cars are part of my sons collection and he found it very interesting shooting those crystal ones, This particular watch I picked up for my son as it is just the right size for his 15 year old wrist. The Tissot is the one I picked up for myself a couple of months back. :D

All the pictures were taken with my aging Coolpix 995 which is to be replaced soon :D
 

Attachments

  • Seiko 1.webp
    Seiko 1.webp
    83.2 KB · Views: 306
  • Seiko 2.webp
    Seiko 2.webp
    10.1 KB · Views: 331
  • Seiko 5.webp
    Seiko 5.webp
    37.9 KB · Views: 355
  • Seiko 6.webp
    Seiko 6.webp
    39 KB · Views: 854
  • Tissot 1.webp
    Tissot 1.webp
    58 KB · Views: 451
  • Tissot 2.webp
    Tissot 2.webp
    41.5 KB · Views: 297
  • Tissot 3.webp
    Tissot 3.webp
    8.5 KB · Views: 825
there looks like a slight imbalance in the light but they are really amazing pics :thumb:

how did you manage to get the light right on the crystal ?
 
Digital camera is a great tool in the sense that you know the results instantly. I kept experimenting with the angle of light and the crystal cars, I knew once the alignment was right. This is something of a luxury which a film camera is not capable of providing.

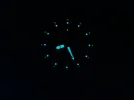
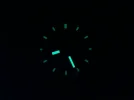
As for the glowing ones I had to do that in darkness since the surroundings needed to be pitch black to get the thing to glow. i of course had to keep the watch very close to the tungstun lamp to revitalise it. The exposure was long so used a tripod otherwise it would be ruined due to blur if handheld.

You talk of imbalance, could you elaborate and tell me which picture?

Anyway thanks for your comments, they always are helpful
 
There was a problem with linking but now have attached the pics to the post itself :)
 
Great pics, Quad!

I can never get the hang of taking close-up pictures with a dark backgroud yet adequade lighting for the object... I'll have to work on it this summer
 
Sexy Bex said:
I can never get the hang of taking close-up pictures with a dark backgroud yet adequade lighting for the object... I'll have to work on it this summer

Black background will never work if used with the matrix metering or centre weighted metering, when working with small reflective objects or ones that give out light you need to work with the spot meter and get the correct exposure reading right off the object. Try it, you will realise that it is not that difficult. Just remember to adjust the lighting according to the need, it should be just enough and not make the object seem washed out. Tripod in such situation becomes mandatory, handheld is impossible with slow shutter speeds. :)

Another thing to keep in mind is to measue the white balance manually as Auto will not give you the correct colours as it entirely depends on the colour temperature of light used and type of light used. I tried with auto and ended up with picutures with a cast of some sort or other, I did it only to see how much difference there was as I never had the intention of shooting on auto white balance mode anyway. I have come to a conclusion that setting white balance manually always gives the most accurate colours. Therefore anyone buying a camera must ensure that this facility is provided in the camera, if not, look for some other models.
 
on the first picture there seems to be a slight reflection on the right hand side, did you use a flash when taking any of them ?
 
Me__2001 said:
on the first picture there seems to be a slight reflection on the right hand side, did you use a flash when taking any of them ?

Very good observation on your part :thumb: Let me explain the whole thing to you.

What you actually see is the reflection of the florescent tube on the far right in the room with a blue reflector at the back giving you the blue light on the bezel of the watch. If I had used the flash it would surely have produced very harsh shadows on the left hand side of the background, agreed? Main illumination on the watch is by the chandelier on the top right with six candle bulbs. The place where I shot the pictures was especially chosen for the available lighting and is basically my daughter’s desk in her room. The black background is actually me wife's silk dress. ;)

You see the whole process involved common things within the household. I never used photographic lights nor any special photographic backgrounds. I was merely trying to teach both my son and daughter how to make do with what you have handy in the house. :)

If you have any more questions I would be happy to answer them.
 
watch round the crystal car I like,. perhaps a white sheet of paper below (and out of shot) would have helped with the illumination on the lower of the watch - dunno,.

either way it's a good way to learn about lighting, using small scale to see what can be done - might have to have a go you've inspired me :)

Sil
 
I agree about the white sheet idea, but I will have a tough time trying to handle the reflection if any from the white sheet particularly on the saphire crystal on the watch itself. When shooting I had to get the angle of the watch in line with the lens as the reflection was causing the black dial to look a bit washed out and grey in color. The polarizer just was not workable since the shutter speeds were in the vicinity of 1 to 1/2 second and aperture was between 3.4 to 5.6 in the given light. By putting on the polarizer I was loosing the depth of field and the image was not a pleasent one to view. Anyway will work on it again on Sunday..

Would love to see your pictures :)
 
yes - I am sure it's a lot easier to make suggestions that it is to actually do it! :lol

I will have a go :)

Sil
 
Hey Quad... ever dabble in studio light painting. I've never done it with a digital camera, always a normal SLR. But I'd be interested to see what you could come up with.
 
Raje said:
Hey Quad... ever dabble in studio light painting. I've never done it with a digital camera, always a normal SLR. But I'd be interested to see what you could come up with.

I think I know what you mean but just in case, would you elaborate for my correct understanding of what YOU mean by "studio light painting"?:)
 
Sorry, thats what they called it in highschool. Its techniqe where you actually paint in your pictures with light. May sound confusing but *can be very simple

You will need a tripod, camera with shutter speed b (you need to be able to leave the shutter open for long periods of time, flash lights, flash or high powered strobe, preferably a black back drop.

I think its best described if I tell you about 2 pictures I have done in the past.
For the fisrt picture I set up my tripod and camera and turned off all the lights. I opened the shutter and then walked over to my desk( sometimes hard to manuver in pitch black) I then took a tiny flash light and actually traced areas of the desk and various objescts on it. Anything I wanted to really stand out, I traced more. Any thing I wanted hidden I shined no light on it at all. This allows complete control of exposure for the entire photo. I then used a bigger flash light and placed it directly in front of the lamp where the bulb was, and pointed it towards that lens, and flashed it. This gives the illusion that the lamp was on, (God I hope I am not confusing you) This photo took about 20 min to complete. When I guessed* I was done, I walked over to the camera and closed the shutter. Did several areas of the room. Its amazing how much freedom this can give you.

The next picture was in a studio setting. I had a person stand infront of a black back drop. I had him hold out his hands as if he was juggling, (hands out, curled just a bit, head tilted looking up) When I felt he was in best possible posisition, I turned the lights off and opened the shutter on the camera(on a tripod). I then walked used a flashed the room with a standard camera flash. This give an intial imprint of my subject. I then walked over and used a very large flashlight and placed it in his hand, bulb facing camera lens. I flashed the flash light quickly. I did so again for the other hand and again, just above my subjects head, in the area of where he might have been looking. I also used the flash light to iluminate the area around his hands. I then close the shutter, then turn on the lights.
When I was done and developed the picture with high contrast. When all done, it gave the illusion that he was actually juggling 3 balls of light.

Lots of things can be done and you can flash over and over again, I had my subject actually pretend to be in a fight, having him shadow box feely and every few secnds told him to freeze, flashed and had him continue. When this pic was done, you saw every pused moment, ghosted on top one another, looked like an agent from the matrix dodging bullets.

Any more questions I'll be happy to answer. And if you really would like I'll look to see If I have any examples to post.
 
Raje,

I am aware of the "painting with light philosophy" that you very well described in your post. I remember when I had purchased the Nikon film camera back in the early 90's had the facility to couple itself with the SB-24 flash unit, the best at that time from Nikon to give the user the ability to have the option of rear curtain synchronisation. With this method employed one could take a long exposure of a moving subject and just at the end of exposure the flash would fire to freeze the action. This resulted in blurry moving image being recorded on film and the final moments would capture the subject giving perfect trail behind rather than in front. The rear curtain sync was the only way to accomplish that. I used this technique in many pictures that I took back then. That was the film camera.

What you describe above obviously is a very long exposure and I am sure the reciprocity failure must have played havoc with the colours of the image you were taking. Some of the films have very poor rating in that respect.

Coming to digital, you know that the reciprocity failure is not an issue but there is something else which will render the image not being very pleasant, its the digital noise which plays havoc when you shoot anything over 1 second. Some of the cameras do better than the others but some are absolutely incapable of managing a decent image.

The other thing which I have experienced having played around with both film and digital types is that the digital is very good when it comes to low key images but does poorly in high key images; this is the other way around when it comes to films. In time to come this will improve as it has since the introduction of the digital camera. The other thing with the type of photography you describe is the power required by a digital camera. Bulb setting on digital for long exposures would be a very big drain on the batteries unlike the cameras of olden days when you never worried about the bulb setting which could last for hours as in pictures depicting the movement of the stars at night.

I have to find time to do this but would feel more comfortable when I replace my film SLR with the Digital SLR few months down the line. Although my present digital camera is perfectly suitable for this kind of experiment having most of the controls that one would need to accomplish the job.

How about you posting the sample you talked about?
 
Ha, those were made years ago!!!!, But I will look, I may still have one or two......
You are correct with the failure rate. One roll of film may take DAYS/WEEKS to fill up depending on how much detail you imploy. But I'd say out of a roll of 27 you get maybe 3-4 decent shots, and 1 good one(to be quite honest its all guess work). Luckily for me, it was high school photo, so we rolled our own film, making custom 30 shot rolls... but all shots were actually in black and white-cost reasons.....If I can't find the ones I described I will attempt new ones in color--- my Pentax SLR is probably covered in dust.... but you've inspired me

OH YEA--- A cool little trick for Macro shots(super close up for those who don't follow photo) on a film SLR, unlock the lens and flip it backwards and hold it in place-- gives an almost fish eye lens look.
 
Last edited:
Back
Top