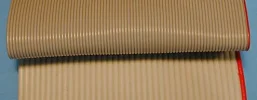
IDE ATA-100 Data Ribbon Cable V IDE ATA-133 Data Ribbon Cable

Joined
Jan 2, 2008
Messages
91
Reaction score
0
How can you tell which one is which from the data ribbon cable?

I brought a data cable IDE today and seller said it is for ATA-133 but it doesnt say that on the ribbon cable itself.

How can one tell which one is which? How do I know its not ATA-133 data ribbon cable?
 
Actually, there should be no visual difference between ATA100 or 133 cables, sometimes called UltraDMA (UDMA) or 80 conductor cables.


Look very closely at my attachment, the "old" 40 col cable is the top one, you don't want that these days, the bottom cable is an 80 ... all 100/133 cables are backward compatible.

SATA cables are a little different. ;)


:user:
 

Attachments

  • ATA_cables.webp
    ATA_cables.webp
    39.5 KB · Views: 1,292
hi, looking at the pictures, so how can one tell which one is 40 conductor or 80 conductor cable? and are they both 100/133 compatible?

muckshifter said:
Actually, there should be no visual difference between ATA100 or 133 cables, sometimes called UltraDMA (UDMA) or 80 conductor cables.


Look very closely at my attachment, the "old" 40 col cable is the top one, you don't want that these days, the bottom cable is an 80 ... all 100/133 cables are backward compatible.

SATA cables are a little different. ;)


:user:
 
No, they are not 'both' 100/133 ... what I was saying is there is no difference between 100/133 visually. What I was trying to show, was the difference between the old & new.


Count the cables, stop counting when you get over 40. ;)


:user:
 
sorry just to be clear do you mean count the cables as in each individual wire going across? That latter one has 80 wires so meaning its the newer one ?

Also, the old ribbon cable is that slower? Why does that one have less wires ?
 
You know, It's not very often do I have to dig deep into my memory. ;)


gtz101 said:
sorry just to be clear do you mean count the cables as in each individual wire going across? That latter one has 80 wires so meaning its the newer one ?
Correct ... 80 wires = new (ish)

Also, the old ribbon cable is that slower? Why does that one have less wires ?
Correct ... it was slower. Why it has less wires, 'cos it was on a slow PC.

There are a lot of issues and problems associated with the original 40 conductor cable due to its very old and not very robust design. Fact is, so too is the 'new' 80 con' cable ... you want speed, go get SATA. :D

Be aware also, the standard colour terminators used on an 80 wire cable are ...

Blue
The blue connector attaches to the motherboard

Black
The black connector is at the opposite end from the Blue one and goes to the master drive (device 0), or a single drive if only one is used.

Gray
The gray connector is in the middle of the cable, and goes to any slave (device 1) drive if you have a second drive.

May I ask if you have even been inside your PC ? What do you want this cable for ?

oh, I found a better picture ... see attachment. :thumb:
 

Attachments

  • wires4080.webp
    wires4080.webp
    13 KB · Views: 408
muckshifter said:
May I ask if you have even been inside your PC ? What do you want this cable for ?

oh, I found a better picture ... see attachment. :thumb:

Thanks for the pic, much clearer. :)

I have been inside my PC, I have changed my power supply, graphics card, sound card in the past and DVD Rewriter.

Never done HDD before. Reason for this cable, simply because I needed a 2nd HDD and on the 1st IDE, its full so I need a 2nd ribbon cable to connect to the 2nd IDE port on the motherboard.

I just wasn't sure about the different IDE cable types so I came on here. When I went to retail store, they specifically advertised for IDE ATA100 ID cable wires or ATA 133 (and so do many online websites) so I wasn't sure what the difference was so thats when I saw this forum :)

1. Just out of interest, the old IDE cable (40 conductor cable), what was the maxmimum speed it could support? Was it ATA-66 only?

2. Also, just briefly, once 2nd HDD is installed, when I boot PC, how do I switch between the 2 HDDs? Do I have to go to BIOS every time to switch between the two. What would be the best way to install Windows XP Professional on the 2nd HDD bearing in mind this HDD will be set as "Master" on the 2nd IDE Ribbon Cable. The 1st HDD is set on Master also but its on the 1st IDE ribbon cable, that HDD already has Win XP Pro and the rest of my Documents etc.
 
Last edited:
... they specifically advertised for IDE ATA100 ID cable wires or ATA 133 (and so do many online websites)
Ouch!! Sad buggers ... somewhere someone is mixing up their terminology. :rolleyes:

ATA is associated with the hard drive, not the cable ... IDE 100/133 cables really are the same. ;)

Current ATA hard drives use the ATA/100 and ATA/133 specs, which are limited to transfer rates of 100 and 133MB/sec, respectively. They use the same IDE cable, an 80 cond' cable. :D

The 'older' ATA 33/66, and older ATAPI (CDRom/Optical drives) could, did, use the 'older' 40 cond' cable. With the advent of the new speed of ATA to 100/133 required using/needing a better cable to carry the data. :thumb:

There is a cliche to all that ... a 7200rpm HD will struggle to offer even 100MB/sec.

Just to throw a spanner in the works, if your system has SATA2, then I, and many here, would have advocated investing in a SATA2 drive. :nod:


You ain't as green as I read you are ... sorry, that sounds condescending, not meant to be.

What is the spec' of your PC, I'm mainly interested in the motherboard, the make / model will do.


:user:
 
once 2nd HDD is installed, when I boot PC, how do I switch between the 2 HDDs? Do I have to go to BIOS every time to switch between the two. What would be the best way to install Windows XP Professional on the 2nd HDD bearing in mind this HDD will be set as "Master" on the 2nd IDE Ribbon Cable. The 1st HDD is set on Master also but its on the 1st IDE ribbon cable, that HDD already has Win XP Pro and the rest of my Documents etc.

Also, any good graphics card that are 1.5V AGP you'd recommend?
 
Huh! silly idea ... why? Please explain.


Hope you have two genuine copies of XP, or you will be breaking the EULA with MS, you'll have a job "activating" an existing copy of XP. ;)


:user:
 
because I will be getting rid of the old HDD eventually but I cant get rid of it atm because I have lots of stuff on it which I don't want to transfer all straight away as it will take about 1 week for me to do. I want to do it gradually whilst still working on my 1st HDD. My Win XP came with my PC when brought brand new.
 
Then the simple solution is to install your new HD as the main HD, just replace it with the old one.


Once you have setup the new drive, with XP and ALL updates, install any software you need.

Then put back the old drive in on IDE 1 (the secondary IDE channel) and that's is all there is to it.

You may, as some do, have to "take ownership" of your data, but it ain't that hard.


Some people even know about the ... Files and Settings Transfer wizard. Before you remove the old drive, follow the instructions below. :D
  1. Insert the Windows XP CD.
  2. Open Windows Explorer and open the Support\Tools directory on the Windows XP CD.
  3. Double click Fastwiz.exe. This launches the Files and Settings Transfer Wizard.
  4. Click Next.
  5. Select Old computer and click Next.
  6. Select the method you want to use to transfer your files and settings. Click Next.
  7. Select the items you want to transfer. Click Next.
  8. If necessary, insert the required media and click Ok.
  9. Click Finish.
Your next step will be to transfer your selected files and settings onto the new computer. Now install the new HD, install XP, update it using Windows Update Site, that may take a few hours, then follow instructions below.

  1. Log onto your new Windows XP computer.
  2. Click Start, point to All Programs, Accessories, System Tools, and select Files and Settings Transfer Wizard. Click Next.
  3. Select New computer. Click Next.
  4. Click I don’t need the Wizard Disk. I have already collected my files and settings from my old computer. Click Next.
  5. Select the transfer method you used to collect your files and settings. Click Next.
  6. Click Finish.
  7. Click Yes to log off the computer.
:user:
 
Back
Top